


How To Choose CMM Machine Size And Measuring Range
2026-05-28 13:15How To Choose CMM Machine Size And Measuring Range
Choosing the right CMM machine size and measuring range is one of the most important decisions before purchasing a coordinate measuring machine. If the measuring range is too small, the machine may not fit the workpiece, fixture, probe head, or stylus movement. If the machine is much larger than needed, buyers may pay unnecessary cost and require more floor space. For CNC machined parts, automotive components, aerospace parts, molds, die-cast parts, EV components, and industrial inspection applications, buyers should evaluate part size, fixture height, probe clearance, part weight, loading method, and future product plans before selecting the CMM size.
Quick Answer
To choose the right CMM machine size and measuring range, buyers should calculate the maximum part length, width, height, fixture height, clamping space, probe head size, stylus length, Z-axis clearance, part loading direction, and future part growth. The selected CMM should provide enough usable measuring volume for the workpiece, fixture, probe movement, and safe operation, not only the part itself.
1. Do Not Choose CMM Size By Part Size Alone
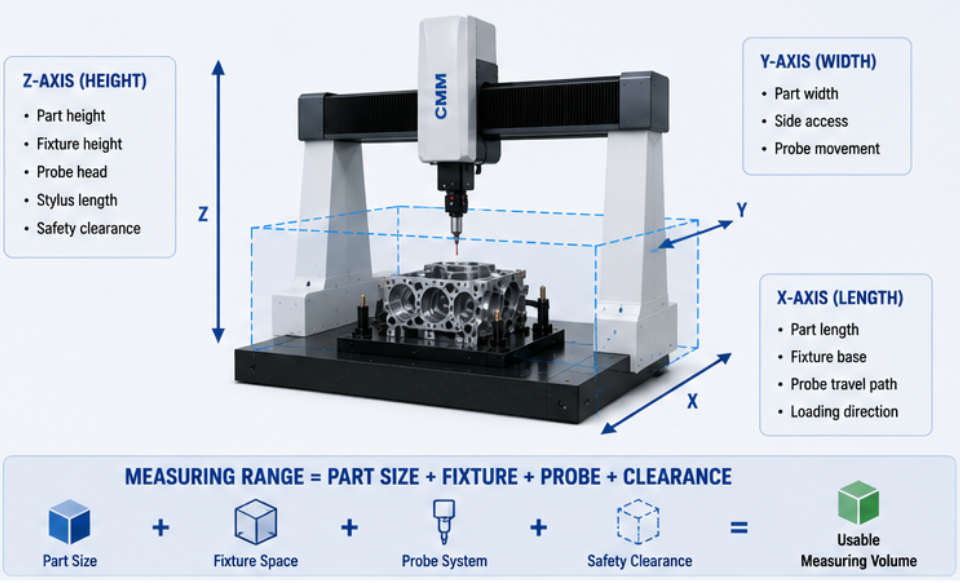
A common mistake is selecting a CMM only by comparing the workpiece size with the machine travel. For example, if a part is 600 mm long, buyers may think a 700 mm measuring range is enough. In real inspection, this may not be sufficient because the fixture, clamps, probe head, stylus, approach path, and safe clearance also require space.
The usable measuring volume is different from the catalog travel. A CMM must have enough room for the probe to approach the part from different directions without collision. If the part has deep holes, side features, tall fixtures, or multiple datum surfaces, the required measuring space may be larger than the workpiece envelope.
Buyers should calculate the complete inspection setup, not only the part body. A correctly sized CMM improves measurement efficiency, reduces collision risk, and supports future inspection needs.
2. Understand X, Y And Z Measuring Range
A CMM measuring range is usually described by X, Y, and Z travel. X and Y determine the horizontal measuring area, while Z determines the vertical measuring height. Buyers should check whether the machine can cover the full workpiece, fixture, and probe movement in all three directions.
| Measuring Axis | What It Means | Buyer Check Point |
|---|---|---|
| X Axis | Machine length direction | Maximum part length, fixture base, probe travel path |
| Y Axis | Machine width direction | Maximum part width, side access, operator loading direction |
| Z Axis | Vertical measuring height | Part height, fixture height, probe head, stylus length, safety clearance |
Z-axis height is often underestimated. A tall part plus fixture plus probe head may require much more vertical travel than expected. For parts with top features, side features, or long stylus access, Z-axis clearance must be checked carefully.
3. Add Fixture Height And Clamping Space
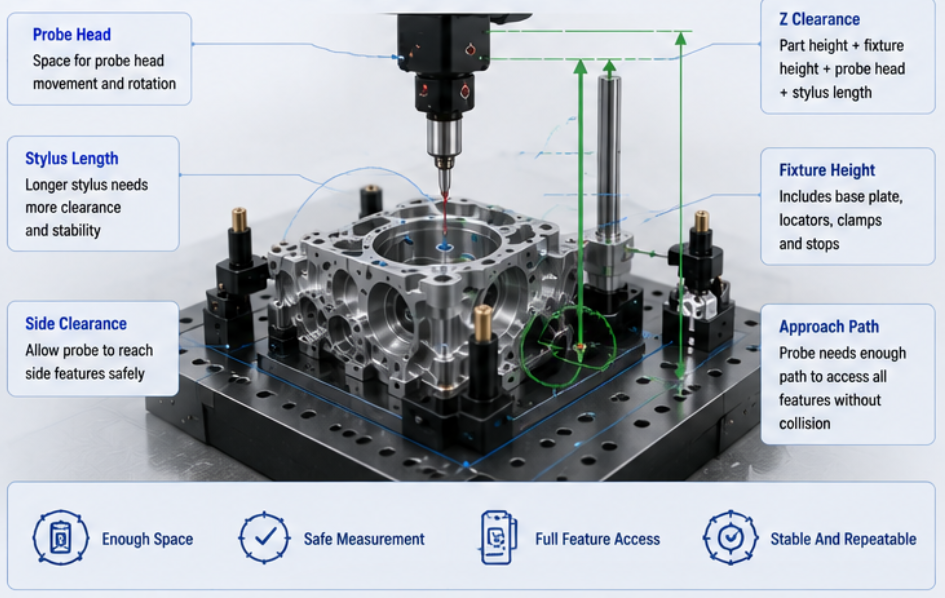
Fixtures are necessary for repeatable measurement, especially in batch inspection. However, fixtures also occupy part of the measuring volume. The fixture base, support columns, locating pins, clamps, stop blocks, and custom holding structures all need space inside the CMM working area.
If fixture space is not considered, the workpiece may fit on the table but the probe may not reach all required features. This is common when measuring automotive housings, CNC machined parts, die-cast components, aerospace brackets, and thin-wall parts that require special support.
Fixture Space Checklist
Fixture base plate size and height
Locating pins, support blocks, and clamps
Part orientation during measurement
Probe access to datum surfaces, holes, bores, and profiles
Loading and unloading direction
Possibility of using multi-part fixtures in the future
4. Consider Probe Head, Stylus Length And Clearance
The probe system also affects the required CMM size. The probe head, stylus, extensions, star styli, angled styli, scanning probe, and probe changer may require additional movement space. When the part has deep holes, internal bores, side surfaces, or narrow slots, the probe may need to approach the feature from different angles.
Buyers should avoid selecting a CMM that only has enough space for the part in one fixed position. The machine should allow collision-free probe movement around the part. This is especially important for CNC programs, automatic inspection, and complex GD&T measurement.
| Probe Factor | Impact On Measuring Range |
|---|---|
| Probe Head Size | Requires enough vertical and side clearance around the workpiece |
| Stylus Length | Longer styli may need more safe movement space and stability checks |
| Star Or Angled Stylus | May require more side clearance to reach multiple features |
| Scanning Probe | Needs smooth path planning for profiles and surfaces |
| Probe Changer | Occupies additional space inside or near the working volume |
5. Check Part Weight And Table Load Capacity
CMM size is not only about dimensions. Part weight and fixture weight must also be checked. Large metal parts, castings, molds, EV components, and heavy machined parts may require a machine with higher table load capacity and a suitable loading method.
If the workpiece and fixture exceed the table load capacity, the machine may be unsafe or unable to maintain stable measurement performance. Buyers should provide the maximum workpiece weight, fixture weight, and loading method before requesting a CMM quotation.
Load Capacity Information To Provide
Maximum workpiece weight
Fixture weight and base plate weight
Part material: aluminum, steel, casting, plastic, composite, or others
Loading method: manual, hoist, crane, robot, or trolley
Frequency of loading and unloading
Need for protection around the table or machine structure
6. Choose Size Based On Inspection Workflow
The right CMM size also depends on inspection workflow. A machine used for occasional sample inspection may prioritize flexibility. A machine used for batch production may require faster loading, repeatable fixture positioning, automatic programs, and clear access for operators.
For production quality control, the CMM should support efficient part handling. If the machine is too small or difficult to access, operators may spend more time loading, positioning, and checking parts. If the machine is properly sized, inspection can become faster, safer, and more repeatable.
| Inspection Scenario | Size Selection Focus | Recommended Consideration |
|---|---|---|
| Sample Inspection | Flexible workpiece size and general features | Leave space for different part types |
| Batch Production | Repeatable fixture and fast loading | Consider fixture size and operator access |
| Large Part Inspection | Large X/Y range and load capacity | Check lifting route and table load |
| Tall Part Inspection | Z-axis height and probe head clearance | Add fixture height and stylus length |
| Automated Inspection | Robot, conveyor, pallet, or probe changer space | Plan system layout before machine selection |
7. Leave Space For Future Part Families
Industrial buyers should not select a CMM only for one current part if future product changes are likely. Many factories later add new CNC machined parts, automotive components, molds, brackets, or larger assemblies. If the CMM is selected with no extra capacity, it may become limited quickly.
However, this does not mean buyers should always choose the largest machine. A practical approach is to select a measuring range that fits current parts and provides reasonable growth space for future applications. This balances investment cost and long-term usability.
8. What Information Should Buyers Provide For Size Selection?
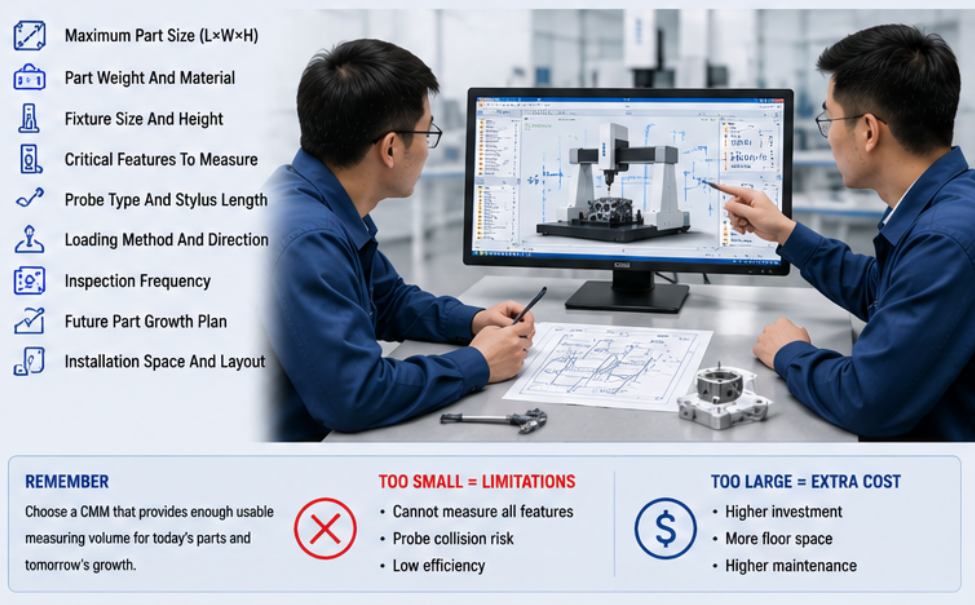
To recommend the right CMM machine size and measuring range, the supplier needs complete workpiece and inspection information. A simple request for “CMM price” is not enough because two parts with similar dimensions may require different machines due to fixture, probe access, tolerance, and measurement workflow.
Recommended Information Checklist
Maximum part length, width, height, and weight
Part drawings and CAD files
Fixture size, fixture height, and clamping method
Critical features to be measured
Probe type, stylus length, and scanning needs
Part loading method and loading direction
Inspection frequency and production volume
Current and future part family requirements
Installation space, room layout, and operator access
9. Common Mistakes To Avoid
Choosing CMM size only by the part envelope without considering fixture space.
Ignoring Z-axis height, probe head size, and stylus length.
Selecting a machine that barely fits the part but limits probe movement.
Forgetting part weight and fixture weight when checking table capacity.
Not considering loading direction and operator access.
Choosing the smallest machine to save cost but reducing future usability.
Choosing an oversized machine without real application need.
Requesting a quotation without drawings, part size, fixture information, and inspection details.
Avoiding these mistakes helps buyers select a CMM that supports reliable measurement, safe operation, and long-term inspection efficiency.
Conclusion
Choosing CMM machine size and measuring range requires more than checking part length, width, and height. Buyers should also consider fixture height, clamping space, probe head size, stylus length, Z-axis clearance, table load capacity, loading method, operator access, inspection workflow, and future part families. A correctly selected CMM provides enough usable measuring volume without unnecessary cost. By preparing complete part and fixture information before quotation, buyers can receive a more accurate recommendation and avoid size-related problems after installation.
Need Help Choosing The Right CMM Size?
Send us your part size, drawing, fixture plan, weight, probe requirements, and inspection workflow. We can help evaluate a suitable CMM machine size and measuring range for your application.